From Stanford Community Farm: red beets, dino kale, yellow onions, bunched carrots, fresh herbs, fennel, and chard.
Wednesday, May 27, 2009
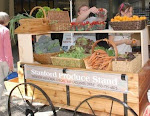
This Friday (5/29/09) We're Selling...
What's in season in May?

NOT in season: brussels sprouts, corn, cucumber, eggplant, okra, olives, parsnips, bell peppers, chili peppers, winter squash, sweet potatoes, tomatillos, tomatoes.
Fruit: apricots, blackberries, bluberries, boysenberries, cherries, grapefruit, lemons, oranges, plums, pluots, raspberries, and strawberries.
NOT in season: apples, asian pears, dates, figs, grapes, kiwi, kumquats, limes, mandarins, melons, nectarines, peaches, pears, persimmons, pomegranates, pomelos, tangerines.
How to prepare beets

Tip: Whenever handling red beets be sure to wear some gloves and an apron to avoid staining your fingers and clothes
Moderate (boiled): Peel and chop beets into bite size chunks. Boil for about 20-30 minutes or until tender. Marinate following this recipe for balsamic marinated beets and toss onto your salads or enjoy them as is:
Ingredients: 1 lb. Beets, boiled, peeled
2 T. Balsamic vinegar
1 t. Dijon mustard
1/2 t. dried thyme or 1 t. fresh
1 shallot minced
1/4 C. virgin olive oil
salt and pepper to taste
2 T. Balsamic vinegar
1 t. Dijon mustard
1/2 t. dried thyme or 1 t. fresh
1 shallot minced
1/4 C. virgin olive oil
salt and pepper to taste
Preparation:
Slice or dice beets according to preference. Combine vinegar, mustard, shallot and thyme, blend well. Slowly whisk in the olive oil until well emulsified. Season to taste with salt and pepper. Combine dressing with beets and let soak for at least 2 hours but overnight is better. Let this dish come to room temperature before serving.
(adopted from balsamic marinated beets recipe as seen on epicurious.com)
Moderate (roasted): Peel and chop beets into bit size chunks and spread out onto a cookie sheet. Preheat oven to 350 degrees while sprinkling some olive oil, salt, pepper and your favorite dried herb (like rosemary) over the beets then roast on the middle rack for roughly 40-50 minutes or until tender. Roast along with other vegetables like squash for a nice dinner side dish.
Background on Beets
The wild beet, the ancestor of the beet with which we are familiar today, is thought to have originated in prehistoric times in North Africa and grew wild along Asian and European seashores. In these earlier times, people exclusively ate the beet greens and not the roots. The ancient Romans were one of the first civilizations to cultivate beets to use their roots as food. Both beets and Swiss chard are different varieties within the same plant family and their edible leaves share a resemblance in both taste and texture. Although typically a beautiful reddish-purple hue, beets also come in varieties that feature white or golden roots.
Beets are an excellent source of the B vitamin, folate, and a very good source of manganese and potassium. Beets are a good source of dietary fiber, vitamin C, magnesium, iron, copper and phosphorus. They also contain powerful nutrient compounds that help protect against heart disease, birth defects and certain cancers, especially colon cancer.
Store beets unwashed in the refrigerator crisper where they will keep for two to four weeks. Cut the majority of the greens and their stems from the roots, so they do not pull away moisture away from the root. Leave about two inches of the stem attached to prevent the roots from "bleeding." Store the unwashed greens in a separate plastic bag where they will keep fresh for about four days.
(for more information visit http://www.whfoods.com)
How to prepare fava beans

Moderate (sauteed): First peel off the outer most layer of the favas and toss them into a medium sauce pan filled with water. Bring water to boil and blanche the beans for 2 minutes. Let the beans cool and then gently peel off the second shell layer. Pierce the skin at the end and pinch it: the bean will come right out. Then sautee on high heat with some garlic and olive oil until the beans are tender, about 4-5 minutes. Be sure not to overcook the fava beans. Flavor with salt and pepper to taste. To make this a more complete side dish toss some chard or kale into the skillet just before the favas are finished and sautee until the leaves wilt and shrink by about 1/4 their original size.
Another great and similar recipe combines fava beans with red onion and mint:
Ingredients:
- 3 cups peeled shelled fresh fava beans (2 1/2 pounds in pod)
- 1 teaspoon plus 2 tablespoons olive oil, divided
- 2 medium red onions, chopped
- Fine sea salt
- Generous handful of mint, roughly chopped (about 1/2 cup)
Preparation:
Cook fava beans with 1 teaspoon oil in boiling unsalted water until tender, 6 to 8 minutes, then drain.
Cook onions in remaining 2 tablespoons oil in a medium skillet over medium heat, stirring, until just crisp-tender, about 4 minutes. Add beans and cook until just heated through, then season with sea salt and pepper. Toss in mint. Serve immediately.
(adopted from Gourmet, April 2008 as seen as epicurious.com)
Background on fava beans
Fava beans are one of the oldest plants under cultivation, and they were eaten in ancient Greece and Rome. Despite the name, fava beans are a member of the pea family, though they are also known as broad beans, pigeon beans, horse beans, and windsor beans. Fava beans intended for consumption are planted in February and March to mature through the summer, with their peak coming in July. The beans grow on bushy plants with tapering leaves, yielding anywhere from 25 to 50 pods per plant. The pods resemble pea pods in shape, although they are much larger and lined with a pillowy white material that protects the seeds inside. Fava beans are also used as a cover crop to protect delicate soil, because they grow quickly and produce a great deal of lush foliage.
Fava beans are popular in Mediterranean cuisine, with many summer dishes celebrating the seasonal bean, although they are also dried for winter use. Fava beans have a distinct flavor and creamy texture that makes them a great addition to a wide variety of dishes.
Fava beans should be shelled and peeled before eating. The outer peel on the beans, while technically edible, is very woody in texture and detracts from the buttery feel of the inner bean. In addition, fava beansshould be cooked before serving because of favism a rare reaction to fava beans found among people of Mediterranean descent. Little risk has been found from eating cooked beans, but some diners may have an allergic reaction to raw or unpeeled favas.
(for more information visit http://www.whfoods.com)
How to prepare dino kale

Easy (sauteed): Chop kale into roughly 2x2 inch pieces. Start cooking a teaspoon of minced garlic and and olive oil in a skillet on medium high heat until it browns. Add in some bits of onion if you like and cook until the pieces become translucent. Then add in the kale and cook until it look wilted and shrink by about 1/4 of its original size. Flavor with some salt and pepper to taste. Add some red pepper flakes for an extra kick. Feel free to play around with some other spices as well.
Moderate (baked): Chop kale into roughly 4x4 inch pieces and spread them out evenly on a cookie sheet. Drizzle with olive oil and sprinkle with some salt. You can also toss the kale in some italian dressing or apple cider vinegar with the olive oila and salt beforehand. Preheat the oven to 350 degrees then bake for 10-15 minutes or until crispy, flipping the pieces over halfway through.
Background on dino kale
Dinosaur kale is the common name for the kale variety known as Lacinato. It features dark blue-green leaves that have an embossed texture. It has a slightly sweeter and more delicate taste than curly kale. Like broccoli, cauliflower and collards, kale is a descendent of the wild cabbage, a plant thought to have originated in Asia Minor and to have been brought to Europe around 600 B.C. by groups of Celtic wanderers. Dinosaur kale is a much more recent variety and was discovered in Italy in the late 19th century.
Kale is particularly rich in beta-carotene (which protects against diseases of the skin) and the carotenoid lutein (which prevents damage to the eyes). One cup of raw kale contains 15% of the recommended daily value of calcium and Vitamin B6, 40% of the magnesium, 180% of the Vitamin A, 200% of the Vitamin C and a whopping 1020% of the Vitamin K. In addition, the sulfur-containing phytonutrients may detoxify carcinogenic substances, and studies have shown that eating kale reduces the risk of breast, ovarian, prostate, colon and other cancers.
Kale should be wrapped in a damp paper towel, placed in a plastic bag and stored in the refrigerator crisper. It should not be washed before storing since this may cause it to become limp. Kale can be kept in the refrigerator for several days, although it is best when eaten within one or two days after purchase since the longer it is stored, the more bitter its flavor becomes.
How to prepare carrots

Super easy (raw): Just eat them as they are with or without any ranch dressing or hummus.
Moderate (roasted): Carrots can also be very good roasted. Peel and chop carrots into bit size pieces and spread them evenly onto a cookie sheet. Drizzle with olive oil and sprinkle some salt, pepper and rosemary or your favorite dried herb to taste. Preheat the oven to 350 degrees. Roast on the middle rack for 30-40 minutes or until tender. Enjoy with other roasted veggies or by itself.
Background on carrots
While we usually associate carrots with the color orange, in fact, carrots grow in a host of other colors including white, yellow, red, or purple, the latter being the color of the original variety. The carrot can trace its ancestry back thousands of years, originally having been cultivated in central Asian and Middle Eastern countries. It later spread throughout the Mediterranean region and was adopted by the ancient Greeks and Romans for its medicinal use.
Carrots are an excellent source of antioxidant compounds, and the richest vegetable source of the pro-vitamin A carotenes. Carrots' antioxidant compounds help protect against cardiovascular disease and cancer and also promote good vision, especially night vision.
The trick to preserving the freshness of carrot roots is to minimize the amount of moisture they lose. To do this, make sure to store them in the coolest part of the refrigerator in a plastic bag or wrapped in a paper towel, which will reduce the amount of condensation that is able to form. They should be able to keep fresh for about two weeks. Carrots should also be stored away from apples, pears, potatoes and other fruits and vegetables that produce ethylene gas since it will cause them to become bitter.
How to prepare cauliflower

Super Easy (raw) : Cut up and enjoy raw with some cold ranch dressing.
Background on Cauliflower
Cauliflower traces its ancestry to the wild cabbage, a plant thought to have originated in ancient Asia Minor, which resembled kale or collards more than the vegetable that we now know it to be. The cauliflower went through many transformations and reappeared in the Mediterranean region, where it has been an important vegetable in Turkey and Italy since at least 600 B.C
Cauliflower and other cruciferous vegetables, such as broccoli, cabbage or kale, contain compounds that may help prevent cancer. These compounds appear to stop enzymes from activating cancer-causing agents in the body, and they increase the activity of enzymes that disable and eliminate carcinogens. Cauliflower is also very low in Saturated Fat and Cholesterol, and is a good source of Protein, Thiamin, Riboflavin, Niacin, Magnesium and Phosphorus, Dietary Fiber, Vitamin C, Vitamin K, Vitamin B6, Folate, Pantothenic Acid, Potassium and Manganese.
Store uncooked cauliflower in a paper or plastic bag in the refrigerator where it will keep for up to a week. To prevent moisture from developing in the floret clusters, store it with the stem side down.
(for more information visit http://www.whfoods.com)
Subscribe to:
Posts (Atom)


